This is intended to be a simple guide to producing a working MapServer CGI installation on Windows and IIS, suitable for serving up Web Mapping Services (WMS) or Web Feature Services (WFS), from the available MapServer download packages. It has been written by James and Crispin bringing together our collective experiences, but it is not guaranteed to be 100% fool proof! Please feel free to add any extra tips as comments below.
{See notes below for additional/modified steps for MapServer 8 vs MapServer 7.}
We tend to structure our MapServer instance as a \MapServer folder with four or five subfolders. One of these is a "scripts" folder, where we put all the executables and dlls plus their essential reference files.
Creating the \scripts folder
The best source for current builds has the files structured for ease of compilation not deployment, containing everything and the kitchen sink, and also requiring PATH variables to be set. Normally we don't need all the files in the downloads, plus we don't like setting environment variables as we usually run multiple instances of MapServer on the same web server, so here is how to assemble the required files into one folder that will run without any.
- Go to http://www.gisinternals.com/sdk/
- If you want the latest stable build (which you probably do) go to the section named “GDAL and MapServer latest release versions:” and download MSVC2022 (x64) –release (currently release-1930-x64-gdal-3-9-1-mapserver-8-2-0)
- When you click on the link you will get a list of options – you want the top one "Compiled binaries in a single .zip package" e.g. release-1930-x64-gdal-3-9-1-mapserver-8-2-0.zip – this is about 25MB.
- There are additional installers on the same page if you need to use some of the specific third party proprietary file formats (e.g. FileGDB, MrSID etc) but you can come back and get these once you have map server up and running
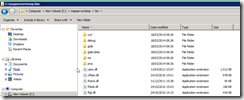
Once you have downloaded unzip the file into a temporary folder. You will see a directory structure within the \bin folder like:
We are looking to extract all the relevant files into a new scripts folder which we can reference from IIS – so create yourself a scripts folder wherever you want it. Then copy:
- All the files (not folders) from root of ~\bin\
- mapserv.exe from C~\bin\ms\apps (Note: there are other utilities in here you might want to use – e.g. legend, shp2img etc – but these are not normally needed for a standard web install)
- If you are using mapscript to communicate with mapserver (not normally needed if using CGI mapserver for WMS service etc) – you also need mapscript.dll and mapscript_csharp.dll from ~\bin\ms\csharp
- If referencing SQL server 2008 spatial data – copy the ~\bin\ms\plugins\mssql2008 folder to your scripts folder (~\scripts\mssql2008 ).
- Create a folder called ~\proj and copy the contents of ~\bin\proj9\share folder into it. Remember to reference this path from your config file (Mapserver 8) or map file.
- Copy the contents of ~\bin\gdal\plugins into a new folder ~\scripts\gdalplugins. {Note @ 04th April 2018 remove these two files if you do not have Oracle installed: gdal_GEOR.dll and ogr_OCI.dll }.
- Copy the contents of ~\bin\gdal-data to your scripts folder (I suspect you can place this elsewhere – but then you probably have to set path variables).
You should end up with something looking like:

Getting it working in IIS
MapServer can run as a web site or as a virtual directory within another web site.
- Once the web site or virtual directory has been created, with its folder path pointing at the MapServer folder, open the "Handler Mappings" for the \scripts subfolder, then click "Edit Feature Permissions..." and switch on "Script" and "Execute". The MapServer folder, plus the other subfolders should have “Read”, “Script” and “Execute” disabled.
- For MapServer 8, add a FastCGI handler for Mapserver by creating a web.config file in the \scripts subfolder and pasting in:
<?xml version="1.0" encoding="UTF-8"?>
<configuration>
    <system.webServer>
        <handlers>
            <add name="MapServerFastCgi" path="*" verb="*" type="" modules="FastCgiModule" scriptProcessor="C:\Mapserver\bin\mapserv.exe"
            resourceType="Unspecified" requireAccess="Script" allowPathInfo="true" preCondition=""  />
        </handlers>
        <caching enabled="true" enableKernelCache="true" />
    </system.webServer>
</configuration>
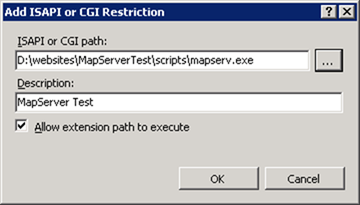
- Permit the MapServer executable (mapserv.exe) to run as a CGI application. In IIS 10.0, select the web server root node, then double-click "ISAPI and CGI Restrictions", then Add... Browse to mapserv.exe, give it the appropriate name, and tick "allow extension path to execute".
- Create a \Mapserver\tmp folder, and set its permissions to give the anonymous web site user account Modify rights. We configure our map files to write logging information and output temporary images into this folder.
- Create a \MapServer\map folder to contain the *.map file(s).
- We create a \MapServer\data folder for any local datasets (other than database connections).
- For MapServer 8, create a mapserver.conf file in the \Mapserver folder and paste in:
	#
        # Sample MapServer 8.0 Config File
	#

	CONFIG

	  #
          # Environment variables
	  #

	  ENV

	    #
	    # Limit Mapfile Access
	    #

	    MS_MAP_NO_PATH "1"
	    # MS_MAP_PATTERN "^/opt/mapserver" ## required when referencing mapfiles by path
	    # MS_MAP_BAD_PATTERN "[/\\]{2}|[/\\]?\\.+[/\\]|,"

	    #
	    # Global Log/Debug Setup
	    #

	    # MS_DEBUGLEVEL "5"
	    # MS_ERRORFILE "/opt/mapserver/logs/mapserver.log"

	    #
	    # Proj Library
	    #

	    PROJ_LIB "[FolderPath]/proj"

	    #
	    # Default Map
	    #

	    # MS_MAPFILE "/opt/mapserver/test/test.map"

	    # disable POST requests (allowed by default, any value will do)
	    # MS_NO_POST "1"

	    #
	    # Other Options
	    #

	    # MS_ENCRYPTION_KEY "/opt/mapserver/mykey.txt"
	    # MS_USE_GLOBAL_FT_CACHE 1 # use a global font cache
	    # MS_PDF_CREATION_DATE "01/02/2022" # PDF create date metadata
	    # MS_MAPFILE_PATTERN "\.map$"
	    # MS_XMLMAPFILE_XSLT "/path/to/mapfile.xsl"
	    # MS_MODE "BROWSE" # default mode for CGI calls
	    # MS_OPENLAYERS_JS_URL "http://openlayers.org/api/OpenLayers.js"

	    MS_TEMPPATH "[FolderPath]/tmp"

	    # MS_MAX_OPEN_FILES 200 # maximum number of open files allowed on Windows

	  END


	  #
	  # Map aliases
	  #

	  MAPS
	    "[MapFileName]" "[FolderPath]/map/[MapFile].map"
	  END

END
- For MapServer 8, edit the default config to:
- Replace [FolderPath] with the path to the \Mapserver folder
- Replace [MapFileName] with the map name to appear in the URL. NB. This must be in double quotes
- Replace [MapFile] with the name of the .map file in the \MapServer\map folder
- Add additional map files to MAPS if required e.g. Staging / Production
- For MapServer 8, go to the IIS root and open FastCGI Settings, then click Add Application. Enter the full path, then click on "Environment Variables" and click on the "..." button. Click Add. In the properties box on the right, enter Name as MAPSERVER_CONFIG_FILE and value as the full path to \Mapserver\mapserver.conf

- It should now be possible to browser to mapserv.exe e.g. http://mywebsite.com/scripts/mapserv.exe If the CGI/FastCGI is configured correctly you will see this output in the browser: “No query information to decode. QUERY_STRING is set, but empty. ”.
Creating a map file
Now we have a working installation of MapServer, but it won’t do anything useful until we have created a map file. This is not the place for a map file tutorial – it’s a massive topic and there is ample documentation here http://mapserver.org/documentation.html#mapfile
However it can be a little daunting getting started, so here’s a simple example that creates a WMS for a simple polygon shapefile – a grid of the 1:10,000 map sheet tiles covering England and Wales, with a single attribute [location] which contains the path to an Ordnance Survey raster image file. So we create this text file: "D:\websites\MapServerTest\map\mapfiletest.map" containing:
MAP
NAME TEST
EXTENT 0 0 800000 1300000
UNITS METERS
SHAPEPATH "D:\websites\MapServerTest\data"
#PROJ_LIB Not needed for MapServer 8
CONFIG "PROJ_LIB" "D:\websites\MapServerTest\proj\nad"
CONFIG "MS_ERRORFILE" "..\tmp\ms_error.config"
# Activate this setting to write diagnostic output to the errorfile for each WMS request
#DEBUG 5
FONTSET fonts.txt
MAXSIZE 100000
OUTPUTFORMAT
NAME png
DRIVER "AGG/PNG"
MIMETYPE "image/png"
IMAGEMODE RGBA # RGBA
EXTENSION "png"
TRANSPARENT ON
# these setting greatly reduce the size of the PNG image
FORMATOPTION "QUANTIZE_FORCE=on"
FORMATOPTION "QUANTIZE_COLORS=256"
END
LEGEND
STATUS OFF
KEYSIZE 18 12
TRANSPARENT OFF
LABEL
TYPE BITMAP
SIZE MEDIUM
COLOR 0 0 89
END
END
PROJECTION
"init=epsg:27700"
END
WEB
IMAGEPATH "..\\tmp\\"
IMAGEURL "../tmp/"
METADATA
"wms_srs" "EPSG:27700 EPSG:4326 EPSG:900913 EPSG:3857"
"wms_onlineresource" "http://mapservertest.esdm.co.uk/scripts/mapserv.exe?map=D:\Websites\mapservertest\map\mapfiletest.map&"
"wms_title" "Test Map"
"wms_abstract" "Test Map"
"WMS_FEATURE_INFO_MIME_TYPE" "text/html"
"ows_include_items" "all"
"ows_enable_request" "*" # REQUIRED for MapServer 6 to enable WMS and WFS
END
TEMPLATE "esdmBrowse.html"
END
LAYER
# Activate this setting to write diagnostic output to the errorfile for each WMS request (for this layer only)
#DEBUG 5
NAME "grid"
STATUS ON
TYPE POLYGON
DATA "10kRasterTileIndex"
PROJECTION
"init=epsg:27700"
END
DUMP True
TEMPLATE "gridinfotemplate.html"
METADATA
"wms_title" "grid"
"wms_srs" "EPSG:27700 EPSG:4326 EPSG:900913 EPSG:3857"
"ows_include_items" "all"
END
CLASS
NAME 'grid'
STYLE
OUTLINECOLOR 50 50 50
WIDTH 1
END
END
END
END
Once the map file has been created, the root address of your WMS will be the web URL of the MapServer executable, with map file passed as a parameter. This will either be a path for MapServer 7 or a map file name from MAPS for MapServer 8. This should match the wms_onlineresource in the map file, so in this test case it is http://mapservertest.esdm.co.uk/scripts/mapserv.exe?map=D:\Websites\mapservertest\map\mapfiletest.map or http://mapservertest.esdm.co.uk/scripts/mapserv.exe?map=MapFileTest
Templates
The map file references two external “templates”.
ESDMBrowse.html contains:
<!-- MapServer Template -->
BROWSE|[version]|[id]|[img]|[ref]|[legend]|[scalebar]|[queryfile]|[map]|[mapx]|[mapy]|[mapext]|[minx]|[miny]|[maxx]|[maxy]|[layers]|[toggle_layers]|[mapwidth]|[mapheight]|[shpminx]|[shpminy]|[shpmaxx]|[shpmaxy]|[shpmidx]|[shpmidy]^
This template is not essential for creating a simple WMS, but it does serve useful diagnostic purposes. If you browse to the map file with a URL like this http://mapservertest.esdm.co.uk/scripts/mapserv.exe?map=D:\Websites\mapservertest\map\mapfiletest.map this template shapes the output, in this case reporting the MapServer version and the names of some test images created in the \tmp folder. If anything is badly wrong with the map file or folder permissions, this will report diagnostic information to help fix the issue. In our map file above the output images will be blank, because no layers are set to STATUS DEFAULT.
And the gridinfotemplate.html file contains:
<!-- MapServer Template -->
<p>Location: [location]</p>
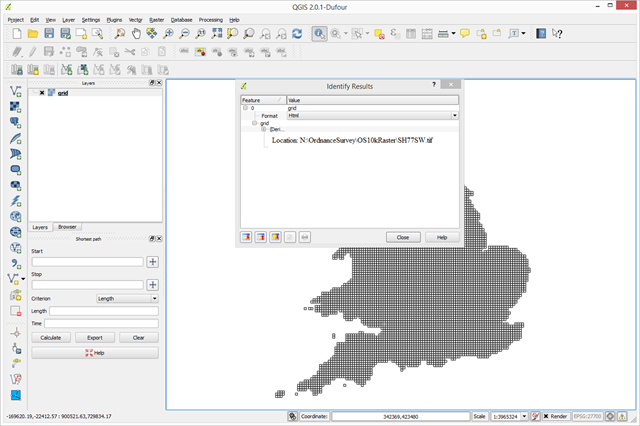
This is used to shape the output to an “info click” (i.e. GetFeatureInfo WMS request) when it is configured to return data in html format. Again this is a large topic so I’ll leave it there.
NB the first line of each template may be only a comment in XML terms, but without it MapServer will choke – keep it in.
Testing the WMS
We should now have a working WMS, but we need to test it. This can be done with any software that can display a WMS, including MapInfo Professional, Quantum GIS, ArcGIS, Google Earth,and numerous others. I’m using QGIS 2.0.1 for this test.
Under the Layer menu choose to “Add WMS/WMTS layer”, then click “New”, and enter the full URL to the map file and a name for the service:
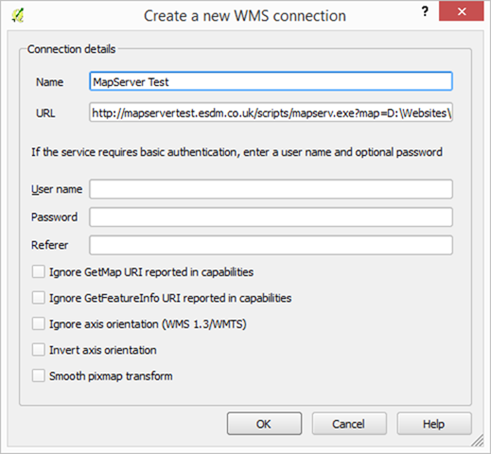
Then on the dialogue you return to when you “OK” this one, click Connect, and you should see your layer available to select:
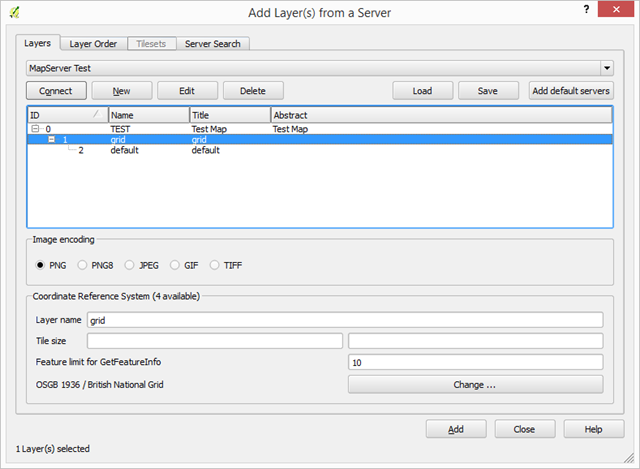
Use this dialogue to set the desired coordinate system too – our example supports output in Ordnance Survey GB (EPSG:27700), WGS84 (EPSG:4326), or Google spherical mercator (EPSG:900913/3857).
Use the “Add” button, and you should see something like this:
