The aim of this is to improve the performance of our mapping (obvious really I hope) both in terms of the speeds a user experiences and in terms of the number of users our server can support.
In this post we are assuming we are looking at WMS – so image caching.
There are a couple of pre-requisites to get caching to work:
- Your WMS requests must be using a recognised tiling system in the same coordinate system as you build your cache.
- You must be requesting your WMS as tiles
Consider your data
Before launching into building tile caches its a good idea to stop and think about your data.
Is the resolution of my data appropriate
If its vector data for example can you simplify it at all (e.g. run .Reduce in SQL server or ST_Simplify in Postgres). We have seen numerous datasets where there are many nodes per metre and this is just extra load if the data is simply going to be displayed against a tiled map so its worth considering if its worth creating simplified version of your data.
What is the maximum zoom I want users to see my data
Its pointless to allow users to zoom in past the appropriate resolution for your data, and as you will see when we build the cache each extra step requires 4 times the storage of the previous level. http://bboxfinder.com provides an easy way to check which tile step you are viewing the map at – and decide what is appropriate for your data. Tile steps run from 0 to 19 normally.
What is the update frequency / churn of my data
Caching is relatively easy if the data is unchanging. If it changes frequently you need to think about how to manage cache refreshing and what is the maximum time that users can wait to see refreshed data. As always there is a trade off with performance here.
Do users filter my data
If users filter your data to display you have to decide if you will cache every possible permutation (which may well not be practical unless the filters are very limited) or just cache the base layer and accept users will hit the source for filtered views.
Deciding what to cache
Once you have decided you want to cache your layer you then need to decide if you are going to cache every zoom level you are displaying the data at – or perhaps just the lower zoom levels and let users hit the source for detailed views (which will reduce your cache storage significantly in some cases)
Enabling caching in geoserver
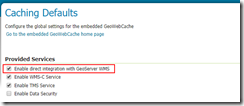
The easiest way to enable caching (in that you can just request your WMS as normal) is to enable direct integration with Geoserver WMS on the Tile Caching, Caching defaults menu. This is not set on a default install.

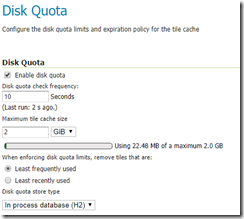
Setting up disk quota
This is an important setting. A pre-seeded cache will take up a lot of disk space and you want to make sure you have enough space set aside. By default the cache will go in your \geoserver\gwc folder
If you do not have limitless disk space its probably worth setting a quota appropriate to your infrastructure.

Setting up caching on individual layers
You must then enable caching on the layer that you want to cache using the Tile caching, Tile Layers menu.
Pick the layers that you want to cache and then click Configure selected layers with caching defaults
There are a few settings we need to consider in here:
Data tab
Bounding boxes
If these are computed from the SRS bounds make sure they cover no more than the area you want cached. http://bboxfinder.com provides an easy way do get coordinates for a custom bounding box.
Publishing tab
HTTP Settings
This allows you to set the headers in the response to the client browser and control how long the browser itself should cache the tile – so not needing to request even the server cached tile again.

Tile caching tab
Tile image formats
Correct setting here can make massive difference to your cache size. If you are in control of the client you might want to restrict caching to just one file format. We tend to use png8 which is normally 25% of the size of png and allows transparency.
Metatiling factors
By default this is 4 x 4 which means when building the cache it will request a tile 4 times the size you actually want – this helps with avoiding chopped labels on the edge etc
Cache expiry
0 means use the server default (which is normally off I think).
-1 means switch off (i.e. never), any other value is the number of seconds till the cache expires

The server cache setting determines how old a cached tile can be before it needs to be regenerated from source. If your data is static you can leave this setting off. If it changes you will need to put some thought into how old its acceptable for data to appear to clients.
The client cache is a little less clear it seems to overlap with the HTTP settings (above) though has been reported to not always work. It may not be needed if you have set the HTTP header response.
Zoom levels
You need to decide what zoom levels are appropriate for your data and whether you want them all cached. Sometimes we don’t cache the most detailed layer as that significantly reduces the cache size.

Seeding the cache
By default having made all the settings above your cache will start to be built. Every time a WMS request is received by GWC the cache will be checked first, it it doesn’t exist in there the tile will be generated and saved in the cache for subsequent requests. As you can imagine the performance of your service will be variable as the cache is randomly built up over time.
Alternatively you can go to https://mygeoserverurl/geoserver/gwc/demo and seed the cache.
Select your layer and decide how many tasks you want to run, the zoom levels you want to seed and the bounding box you want to seed within. Then set it running.
Note: For detailed zoom levels this will take many hours / days and use potentially TB of disk space
Testing your cache
Hopefully you will see a noticeable performance gain when the cache is being hit, but there are a couple of checks you can do in a client browser.
First of all though – remember you cache will only be used if:
- Your application is requesting WMS tiles
- The call includes &TILES=True as part of the call
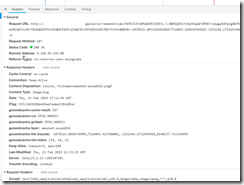
If you open the dev tools in your browser (we are using chrome here – but firefox and IE have similar) and inspect a call you are making to geoserver

There are several things you can see from the headers:
- Status code 200 – this means that the call was made (as opposed to locally cached)
- geowebcache-cache-result: HIT – this tells you that your tile was found in the cache.

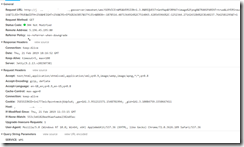
If you refresh the page you case see:
- Status code 304 – this shows that the tile was retrieved from your local browser cache.
- Because it came from your local cache there is no geowebcache value.